tiny-spring 源码分析
一、前言
想研究 Spring 的源码,但是里面包和类众多、层级很深,不知道如何入手。后来发现了 tiny-spring 这个项目,可以认为是一个极简版本的 Spring,但是麻雀虽小五脏俱全,实现了最核心的 IOC 容器和 AOP 的功能,非常适合拿来入门研究和学习,本文就是对这个项目源码的一点分析。
二、Hello World
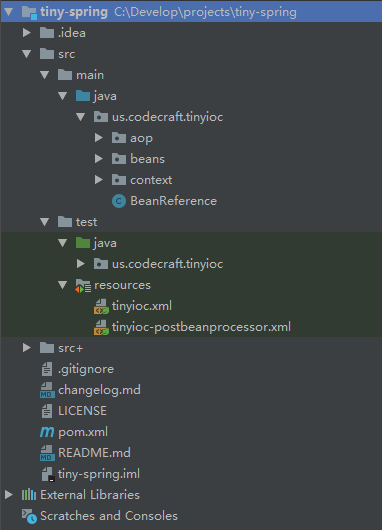
把代码下载下来,在IDE里打开,整体项目结构如下,是一个标准 Maven 工程:
我们可以从作者提供的测试代码上手,先来看一下 ApplicationContextTest ,很标准的 Spring IOC 容器使用范例:
public class ApplicationContextTest {
    @Test
    public void test() throws Exception {
        ApplicationContext applicationContext = new ClassPathXmlApplicationContext("tinyioc.xml");
        HelloWorldService helloWorldService = (HelloWorldService) applicationContext.getBean("helloWorldService");
        helloWorldService.helloWorld();
    }
}
再看一下 tinyioc.xml 的配置(省略了部分信息),这里的配置也是我们非常熟悉的写法:
<?xml version="1.0" encoding="UTF-8"?>
<beans ...>

    <bean id="outputService" class="us.codecraft.tinyioc.OutputServiceImpl">
    </bean>

    <bean id="helloWorldService" class="us.codecraft.tinyioc.HelloWorldServiceImpl">
        <property name="text" value="Hello World!"/>
        <property name="outputService" ref="outputService"/>
    </bean>

</beans>
HelloWorldService 是一个非常简单的服务,调用了 OutputService 来输出自己的成员变量 text:
public class HelloWorldServiceImpl implements HelloWorldService {

    private String text;

    private OutputService outputService;

    @Override
    public void helloWorld(){
        outputService.output(text);
    }

    public void setText(String text) {
        this.text = text;
    }

    public void setOutputService(OutputService outputService) {
        this.outputService = outputService;
    }

}
然后 OutputServiceImpl 就是直接调用系统输出:
public class OutputServiceImpl implements OutputService {

    @Override
    public void output(String text){
        System.out.println(text);
    }

}
是不是感觉很亲切?和我们平时使用的 Spring 是一样的,运行一下 ApplicationContextTest ,果然输出了:Hello World!
接下来看一下 Spring 两大核心 IOC 容器和 AOP 的实现。
三、IOC 容器的实现
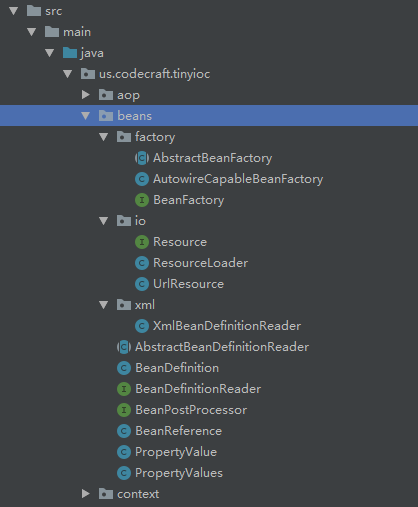
IOC 容器的实现在beans包下面,结构如下图所示:
IOC容器的核心类是 BeanFactory,继续从测试用例入手,看看 BeanFactoryTest 的代码:
public class BeanFactoryTest {

    @Test
    public void testLazy() throws Exception {
        // 1.读取配置
        XmlBeanDefinitionReader xmlBeanDefinitionReader = new XmlBeanDefinitionReader(new ResourceLoader());
        xmlBeanDefinitionReader.loadBeanDefinitions("tinyioc.xml");

        // 2.初始化BeanFactory并注册bean
        AbstractBeanFactory beanFactory = new AutowireCapableBeanFactory();
        for (Map.Entry<String, BeanDefinition> beanDefinitionEntry : xmlBeanDefinitionReader.getRegistry().entrySet()) {
            beanFactory.registerBeanDefinition(beanDefinitionEntry.getKey(), beanDefinitionEntry.getValue());
        }

        // 3.获取bean
        HelloWorldService helloWorldService = (HelloWorldService) beanFactory.getBean("helloWorldService");
        helloWorldService.helloWorld();
    }

}
接下来一步一步看:
1. 读取配置
XmlBeanDefinitionReader 的作用是读取 XML 文件中配置的信息,解析为 BeanDefinition 并存储起来,看一下这个类的代码就可以明白大致流程,这里不再详细展开。
看 XmlBeanDefinitionReader 代码会发现,这里还牵涉到了 Spring 对于资源的抽象:
- Resource: 代表资源实体,可以调用
getInputStream接口获取资源的输入流。- ResourceLoader: 代表资源加载器,可以调用
getResource接口从指定的位置加载资源。tiny-spring 这里只提供了 UrlResource 和 UrlResourceLoader 实现。
这一步的最终产物 BeanDefinition 是 Spring 中非常重要的一个类,保存了 Bean 的元数据信息,是后面注册和实例化 Bean 必不可少的,这里贴一下其代码:
public class BeanDefinition {

	private Object bean;

	private Class beanClass;

	private String beanClassName;

	private PropertyValues propertyValues = new PropertyValues();

}
2. 初始化 BeanFactory 并注册 bean
BeanFactory 接口的定义是极简风格:
public interface BeanFactory {

    Object getBean(String name) throws Exception;

}
注册 bean 的方法是 registerBeanDefinition ,逻辑在 AbstractBeanFactory 里,这里其实就是把 BeadDefinition 转存一下:
public abstract class AbstractBeanFactory implements BeanFactory {

    private Map<String, BeanDefinition> beanDefinitionMap = new ConcurrentHashMap<String, BeanDefinition>();

    private final List<String> beanDefinitionNames = new ArrayList<String>();
    ...
    public void registerBeanDefinition(String name, BeanDefinition beanDefinition) throws Exception {
        beanDefinitionMap.put(name, beanDefinition);
        beanDefinitionNames.add(name);
    }
    ...
}
3. 获取 bean
这里才是重头戏,来看一下 getBean 的流程:
public abstract class AbstractBeanFactory implements BeanFactory {
    ...
    @Override
    public Object getBean(String name) throws Exception {
        BeanDefinition beanDefinition = beanDefinitionMap.get(name);
        if (beanDefinition == null) {
            throw new IllegalArgumentException("No bean named " + name + " is defined");
        }
        Object bean = beanDefinition.getBean();
        if (bean == null) {
            bean = doCreateBean(beanDefinition);
            bean = initializeBean(bean, name);
            beanDefinition.setBean(bean);
        }
        return bean;
    }
    ...
}
代码逻辑简单明了:首先拿到 name 对应的 BeanDefinition,然后检查 Bean 实例,如果非空,直接返回即可;如果实例为空,则说明尚未初始化过,则执行一次初始化逻辑,包括 doCreateBean 和 initializeBean 两步。
先来看看 doCreateBean 的实现:
public abstract class AbstractBeanFactory implements BeanFactory {
    ...
    protected Object doCreateBean(BeanDefinition beanDefinition) throws Exception {
		Object bean = createBeanInstance(beanDefinition);
		beanDefinition.setBean(bean);
		applyPropertyValues(bean, beanDefinition);
		return bean;
	}

    protected Object createBeanInstance(BeanDefinition beanDefinition) throws Exception {
        // 直接利用 Java 的反射机制创建实例
		return beanDefinition.getBeanClass().newInstance();
	}

    protected void applyPropertyValues(Object bean, BeanDefinition beanDefinition) throws Exception {

    }
    ...
}
applyPropertyValues 是在为成员变量赋值,AbstractBeanFactory 并未实现,具体逻辑放在了子类 AutowireCapableBeanFactory 里:
public class AutowireCapableBeanFactory extends AbstractBeanFactory {
    protected void applyPropertyValues(Object bean, BeanDefinition mbd) throws Exception {
        if (bean instanceof BeanFactoryAware) {
            ((BeanFactoryAware) bean).setBeanFactory(this);
        }
        for (PropertyValue propertyValue : mbd.getPropertyValues().getPropertyValues()) {
            Object value = propertyValue.getValue();
            if (value instanceof BeanReference) {
                BeanReference beanReference = (BeanReference) value;
                value = getBean(beanReference.getName());
                // 这里其实是会有循环依赖的问题的,Spring 的解决方案可以参见:https://www.jianshu.com/p/6c359768b1dc
            }
            try {
                // 利用反射机制调用 setter 方法
                Method declaredMethod = bean.getClass().getDeclaredMethod("set"
                        + propertyValue.getName().substring(0, 1).toUpperCase() + propertyValue.getName().substring(1),
                        value.getClass());
                declaredMethod.setAccessible(true);
                declaredMethod.invoke(bean, value);
            } catch (NoSuchMethodException e) {
                Field declaredField = bean.getClass().getDeclaredField(propertyValue.getName());
                declaredField.setAccessible(true);
                declaredField.set(bean, value);
            }
        }
    }
}
最后是 initializeBean 的实现,就是循环调用了一遍前置和后置的 BeanPostProcessor:
protected Object initializeBean(Object bean, String name) throws Exception {
    for (BeanPostProcessor beanPostProcessor : beanPostProcessors) {
        bean = beanPostProcessor.postProcessBeforeInitialization(bean, name);
    }

    // TODO:call initialize method
    for (BeanPostProcessor beanPostProcessor : beanPostProcessors) {
        bean = beanPostProcessor.postProcessAfterInitialization(bean, name);
    }
    return bean;
}
至此,获取 Bean 的流程就走完了,我们拿到了一个初始化过且注入了依赖的完整 Bean 实例。
此时再去看 context 包下面的几个类,会发现 ApplicationContext 其实就是把上面的1,2,3 步揉在了一起,没有什么新东西,不再赘述。
四、AOP 的实现
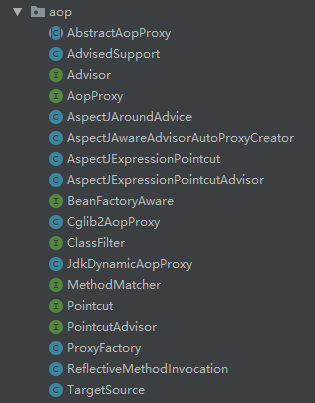
接下来分析一下 AOP 模块的实现。先来看一下整体包结构:
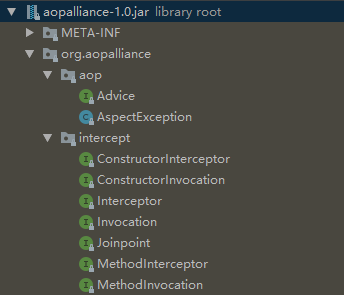
另外还要特别注意一下 aopalliance 这个三方包,这个项目的目的是规范和统一 AOP 中的概念,核心类如下所示(关于这些类的含义这里不再展开,想详细了解的可以去 官网):
继续从测试用例入手,我们来看 JdkDynamicAopProxyTest 这个类(Cglib2AopProxyTest和它几乎一致,只是创建代理时使用了cglib):
public class JdkDynamicAopProxyTest {

	@Test
	public void testInterceptor() throws Exception {
		// --------- helloWorldService without AOP
		ApplicationContext applicationContext = new ClassPathXmlApplicationContext("tinyioc.xml");
		HelloWorldService helloWorldService = (HelloWorldService) applicationContext.getBean("helloWorldService");
		helloWorldService.helloWorld();

		// --------- helloWorldService with AOP
		// 1. 设置被代理对象(Joinpoint)
		AdvisedSupport advisedSupport = new AdvisedSupport();
		TargetSource targetSource = new TargetSource(helloWorldService, HelloWorldServiceImpl.class,
				HelloWorldService.class);
		advisedSupport.setTargetSource(targetSource);

		// 2. 设置拦截器(Advice)
		TimerInterceptor timerInterceptor = new TimerInterceptor();
		advisedSupport.setMethodInterceptor(timerInterceptor);

		// 3. 创建代理(Proxy)
		JdkDynamicAopProxy jdkDynamicAopProxy = new JdkDynamicAopProxy(advisedSupport);
		HelloWorldService helloWorldServiceProxy = (HelloWorldService) jdkDynamicAopProxy.getProxy();

		// 4. 基于AOP的调用
		helloWorldServiceProxy.helloWorld();

	}
}
helloWorldService without AOP 部分还是IOC容器的内容,不再多说,看下面的 helloWorldService with AOP 部分,一步步来分析:
1.设置被代理对象
首先创建了一个 AdvisedSupport ,这个类存储了代理的元数据,具体来说就是下面三个东东:
public class AdvisedSupport {

    /**
    * 被代理的对象信息
    */
    private TargetSource targetSource;

    /**
    * 方法拦截器信息
    */
    private MethodInterceptor methodInterceptor;

    /**
    * ?
    */
    private MethodMatcher methodMatcher;

    // ...
}
在这一步里设置代理对象,就是指 TargetSource ,这个类存储了被代理的对象的信息 :
public class TargetSource {

    // 被代理对象的类信息
    private Class<?> targetClass;

    // 被代理对象实现的接口(一个疑问:为什么要显式传递,而不是通过targetClass获取?)
    private Class<?>[] interfaces;

    // 被代理对象的实例
    private Object target;

    public TargetSource(Object target, Class<?> targetClass, Class<?>... interfaces) {
        this.target = target;
        this.targetClass = targetClass;
        this.interfaces = interfaces;
    }

    // ...
}
2.设置拦截器
设置 AdvisedSupport 的 methodInterceptor 属性,这里设置了一个简单的 TimerInterceptor ,只有计时功能:
public class TimerInterceptor implements MethodInterceptor {

	@Override
	public Object invoke(MethodInvocation invocation) throws Throwable {
		long time = System.nanoTime();
		System.out.println("Invocation of Method " + invocation.getMethod().getName() + " start!");
		Object proceed = invocation.proceed();
		System.out.println("Invocation of Method " + invocation.getMethod().getName() + " end! takes " + (System.nanoTime() - time)
				+ " nanoseconds.");
		return proceed;
	}

}
3.创建代理
被代理的对象和拦截器准备就绪后,就可以执行创建代理了,这里是一个 JdkDynamicAopProxy。
public class JdkDynamicAopProxy extends AbstractAopProxy implements InvocationHandler {

    public JdkDynamicAopProxy(AdvisedSupport advised) {
        super(advised);
    }

	@Override
	public Object getProxy() {
        // 使用 JDK 动态代理机制创建代理
		return Proxy.newProxyInstance(getClass().getClassLoader(), advised.getTargetSource().getInterfaces(), this);
	}

	@Override
	public Object invoke(final Object proxy, final Method method, final Object[] args) throws Throwable {
		// 暂略
	}

}
父类 AbstractAopProxy 里没什么东西,就是存储了一个 AdvisedSupport 实例:
public abstract class AbstractAopProxy implements AopProxy {

    protected AdvisedSupport advised;

    public AbstractAopProxy(AdvisedSupport advised) {
        this.advised = advised;
    }

}

public interface AopProxy {

    Object getProxy();

}
4.实际调用
通过上面可知,我们此时拿到的 HelloWorldService 实例其实是一个动态代理对象,当调用其方法时,实际上会调用 InvocationHandler 的 invoke 方法:
   public class JdkDynamicAopProxy extends AbstractAopProxy implements InvocationHandler {

       // ..

   	@Override
   	public Object invoke(final Object proxy, final Method method, final Object[] args) throws Throwable {
   		MethodInterceptor methodInterceptor = advised.getMethodInterceptor();
   		if (advised.getMethodMatcher() != null
   				&& advised.getMethodMatcher().matches(method, advised.getTargetSource().getTarget().getClass())) {
   			return methodInterceptor.invoke(new ReflectiveMethodInvocation(advised.getTargetSource().getTarget(),
   					method, args));
   		} else {
   			return method.invoke(advised.getTargetSource().getTarget(), args);
   		}
   	}

   }
终于在这里 MethodMatcher 派上了用场,其作用是判断当前调用的方法是否是需要进行拦截,如果是,则调用我们设置好的 MethodInterceptor 的 invoke 方法;
否则,就直接调用目标对象,什么额外逻辑也不做。
至此就把 JdkDynamicAopProxyTest 的主要逻辑也梳理完毕了。